

How To Add Closed Captioning In Premiere Pro
Skip to Main Content
![]()
![]()
https://go.3playmedia.com/meetings/3play/3play-media-pro-plan-discussion
Captions and Subtitles with Adobe Premiere Pro
Adobe Premiere Pro is a video editing software that allows you to create and add together airtight explanation and subtitle tracks to video projects. Premiere captions can be exported equally a side motorcar file or as an encoded video file. This step-by-stride guide will show you how to add captions to your video in Adobe Premiere Pro with 3Play Media.

How to Add Subtitles to Videos in Adobe Premiere & Adobe Encore
Download our complimentary guide to captioning videos in Adobe Encore and Adobe Premiere Pro.
Download now
Step 1: Submit Your Video File for Captioning
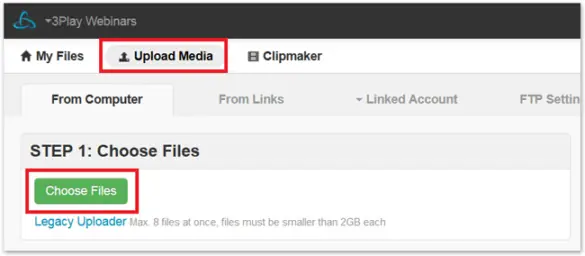
Log into your 3Play Media account. From the Upload tab at the top of the screen, select From Figurer, choose your video, and follow the onscreen prompts to specify turnaround. Yous'll receive an electronic mail when your captions are ready.
For additional details, read the support article on uploading videos for captioning.
Step ii: Download Your Captions in SCC Format
Go to the My Files page in your 3Play Media account and select your recording. Click Download and select the SCC format. Specify any avant-garde settings and save the .scc explanation file to your computer.

Step 3: Import Explanation File into Your Project in Adobe Premiere Pro
Open your video project file in Adobe Premiere Pro.
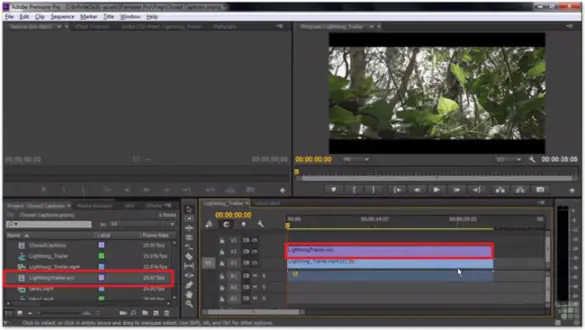
From the top nav bar, select File > Import . Select your .scc caption file and hit Open up. The caption file should now appear in your project'southward file list, resembling a video file with no audio. Elevate and driblet the explanation file to the right into your video sequence.
The image below displays approximately where you should encounter your caption file in the file listing, and where it ends upward when you lot drag and drop it to the right.
Pace 4: Enable Closed Captioning in Adobe Premiere Pro
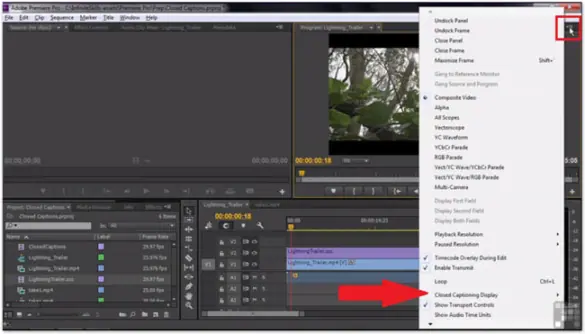
In order to get your caption file to work when your video plays, y'all demand to starting time enable airtight captioning in Adobe Premiere's program monitor.
Click on the far upper-righthand corner of the plan monitor where your video displays. Gyre downward and click Closed Captioning Brandish > Enable. Your captions should now appear on your video display in the program monitor.
Stride 5: Customize Explanation Display in Adobe Premiere Pro
Adobe Premiere Pro offers tools to adjust the font color, groundwork color, line breaks, timing, and placement of your captions on your video.
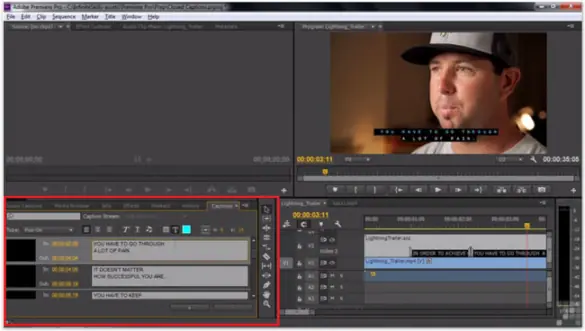
To customize caption display, open the Captions Panel. Navigate to Window > Captions, and and so select your explanation file in the video sequence. The Captions Panel should at present display where your project file list used to be.
Step 6: Consign Captioned Video from Adobe Premiere Pro
When your video file is finished, you have two options for how to publish your video with captions. Y'all can either embed the captions within the video or export them as a split sidecar file.
How to Export Captions as Sidecar File from Adobe Premiere Pro
First, select your caption file in the sequence. Next, in the top nav bar, go to File > Consign > Media. In the Consign Settings popup box, select the desired file format for your video. Click on the Captions tab. Click on Export Options and select Sidecar File.
Here you accept four options for caption file formats. The beginning two formats listed, SCC and MCC, are the nearly common. You can as well cull SMPTE Timed Text (.xml) or EBU N19 Subtitle (.stl) formats. Select your desired caption file format and striking Export.
How to Embed Captions in Video from Adobe Premiere Pro
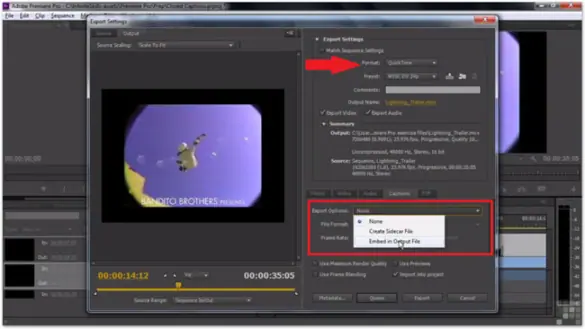
You tin embed captions direct into a video from Adobe Premiere if you publish it every bit a Quicktime file.
First, select your caption file in the sequence. Next, in the superlative nav bar, go to File > Export > Media. In the Export Settings popup box, select Format > Quicktime. Under Export Options, select Embed in Output File, then Export.
Adding captions & subtitles to video with Adobe Premiere Pro & Encore

How To Add Closed Captioning In Premiere Pro,
Source: https://www.3playmedia.com/learn/how-to-guides/adobe-premiere-pro-captions-and-subtitles/
Posted by: palmerrecance.blogspot.com
0 Response to "How To Add Closed Captioning In Premiere Pro"
Post a Comment