

How Do I Add Bleed To A Pdf File
Acme Press Place Order Now
Payment Methods Free Professional person File Checking Services Free Proofs of Your Art Files 
Making PDF Files
With Crop Marks & Bleeds for Commercial Press
PDF is by far the best file format to supply your artwork to a commercial printing company. Properly made, a PDF file avoids three of the most common problems when sending your art file to be printed – or sharing any kind of document with anyone else.
Advantages of PDF Files
- Providing a PDF of your artwork to your printing company solves the headaches…
- The fonts and images are embedded into the document (no need to gather them upwardly to provide to the printer)
- PDF's display and impress the same on all computers (PDF is an abridgement for Portable Certificate Format
- PDF'due south are compressed, so the file size is much smaller than their native fine art files. The quality of your printing, nevertheless, volition not be compromised every bit long as the PDF file is saved properly.
- As long as y'all are not using a raster-art blueprint program, all type and other vector art will remain crisp and pixel-free. In contrast, if you save to JPG or other raster file formats, all type and vector art will have pixels in information technology.
- If your printing visitor needs to make minor edits to your art file before printing, a PDF file can be opened in Adobe Illustrator to make necessary adjustments.
Important Aspects of Making PDF Files
- Quality - most programs volition give you lot several options as to the quality of the file. When making a PDF for a press company information technology is very of import that you choose "Printing Quality" in the options Menu. A Press Quality PDF will output at 300dpi for commercial printing. Many people mistakenly choose "loftier quality impress," which is inferior to press quality, resulting in lower quality (150 dpi) images in your PDF file. (high-quality impress is for your desktop printer)
- Crop Marks an Bleed - if you are wanting a certificate to impress all the mode to the edges (without a white edge) information technology is called a BLEED. Creating a PDF with crop marks and drain is relatively simple, but the document must be set up properly get-go for the process to work. The certificate size, folio margin, and bleed zones all demand to be correct - run across Print Ready Art.

PDF Settings
for Crop Marks and Drain
If you lot are wanting to make a PDF with crop marks and bleed for a commercial printing company, the settings in the dialog box to the left are the most crucial selections that demand to be selected. As stated above, it is critical, however, that your document is fix correctly earlier you make the PDF.
Offset, your Document Size must be the finished size of what you are wanting to impress (such as eight.five″ x 11″ for a letterhead, or 3.five″ x two″ for a business bill of fare).
Margin and Bleed: Any background colors, images, etc. that you lot want to bleed demand to extend Past the certificate edges, (typically ⅛″ on all 4 sides). It is also important that your margins are right: your text and other copy not be too close to the document edges (typically at least ⅛″ on all four sides) - for more details come across Print Set up Fine art.
Methods of Making PDF Files
Software Variations - due to the big number of blueprint software programs that are available, the data contained in these tutorials serve equally a guideline only. Your particular software may have pregnant differences in PDF options and/or location of the various PDF settings.
Most modern design software can be saved to the PDF format. Depending on what design software y'all are using, exactly HOW you lot salvage to PDF can vary. Your detail software may be capable of one, two, or all iii of these methods:
FILE > Save Every bit FILE > Export FILE > Impress
Using the "Save Every bit" or "Export"PDF Making Methods
* PDF cosmos dialog boxes for either one of these two methods have the same general bill of fare choices.
Choose either FILE > SAVE AS or FILE > Consign from the top menu.
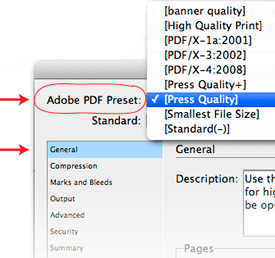
The showtime stride is to make up one's mind the quality of the PDF.
In the Full general Tab (highlighted in blue), in that location are diverse PDF quality settings
(in Adobe software called the Adobe PDF Preset).
Choose "Press Quality" when making a PDF for professional printing.
Exercise Non choose "High Quality Impress", as that setting is for your desktop printer
(the quality level is too low for commercial printing).
You may have noticed there is a preset option in the listing to the right called "Press Quality +" that is not available in your job options listing. It is a custom Adobe PDF setting used at Summit Printing for extra high-quality PDF files (since many of our products impress at photo-quality 500 dpi).
If you lot would like to install it, we accept provided it for download at no charge.
As long as your document size and drain zones are correctly prepare upwardly in that location is only one more footstep.
Select the "Marks and Bleeds" tab (highlighted in blue).
1) Bank check the Crop Marks Box in the Marks section (leave the remainder unchecked).
2) In the Bleed and Slug section un-check Employ Document Bleed Settings and set all four sides to 0.125 in
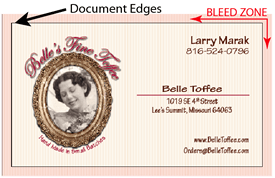
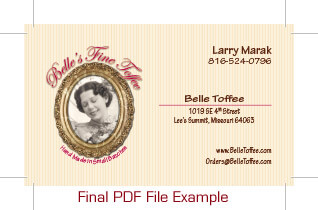
If the certificate was properly setup and the above instructions followed exactly, the resulting PDF should await like the "Final PDF File Instance" to a higher place. The corner crop marks define to the printing visitor precisely where the document should cutting. Extending Past the trim marks is the additional background bleed area needed to ensure in that location will be no white not bad (unprinted paper) on the edges when trimmed out.
Information technology is unlikely that whatever printing company will desire yous to print any of the other printer's marks on your artwork. Press companies put on their own printer'south marks where THEY want them during the prepress procedure, and may find information technology annoying and perhaps even need to remove whatever colour bars, registration marks or drain marks placed on your art.
File > Print
Press a PostScript and Distilling to PDF
The best method for creating a flattened, well compressed, production-quality PDF art file starts by press a PostScript file. Then the PDF file is created using the Adobe Distiller (with a printing-quality or custom job option setting selected). To perform this method with full control of the dialog box setting, however, requires the Adobe PostScript engine (show beneath nether PPD as Adobe PDF nine.0). Adobe stopped installing information technology in the last few versions of the Adobe Creative Suite, deeming it unnecessary (because of the other two methods shown above), so you lot may demand to download and install the PPD manually to utilize this method.

Choose File > Print from the pinnacle carte du jour. Select the Marks and Bleed tab.
In the Printer selector choose PDF
In the PPD Selector, Cull Adobe PDF
In the Marks section,
bank check "Trim Marks"
(some dialogs say "Crop Marks")
In the Bleed department, un-check
"Apply Certificate Drain Settings."
Set the bleed to 0.125″ on all four sides.
Note: if the units are non in inches,
it can be changed in the preferences section.
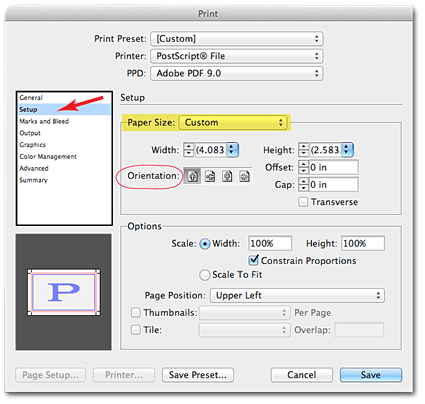
The settings for the side by side pace may be located in one of two different locations: either the Full general or Setup tabs.
Discover the document preview window in the lower left corner. If your document is not right-side-up (or however you lot desire your last art file) utilize the Orientation selector to rotate it.
Finally, alter the "Newspaper Size" choice to custom. Paper size must be selected LAST or your drain and ingather marks would not show up in your PDF file.
Finishing your PDF
Depending on your software, in that location may not be any more important selections to make, and you are ready to save your PostScript file. Once you have your finished PostScript file, open the Adobe Distiller and choose the Press-Quality job selection and select your PostScript file to be processed into your final PDF print production fine art file.
Additional PDF Options
Some programs may have additional options allowing more than control over the PostScript / PDF job options. The screen-shots below are from the Adobe Illustrator print to PostScript file task options:
Some programs, such as Adobe Illustrator, may have an option to specify
the "Printer Resolution"
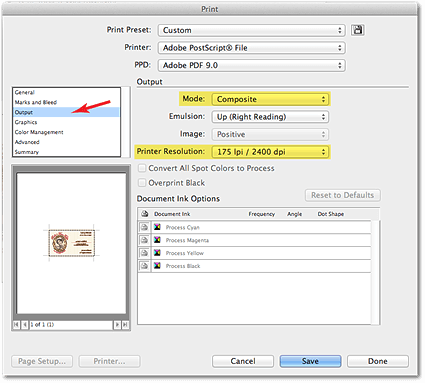
Select the Output tab,
Most printing presses print at 150-175 lpi (lines per inch), so 175 should be an acceptable in virtually cases.
Notation: any resolution setting beyond what the printing printing is even capable of producing will non yield amend quality printing, but a much bigger PDF. Much of the full color printing items at Peak Press print at 250 lpi, so in some cases you might want to select the highest option available: 200 lpi.
NOTE: to cheque for proper color separations, such equally for a 2-color print chore using Pantone Solid Colors, y'all can select "Separations" in the Mode setting to make sure your inks are properly designated (such as no CMYK colors). If printing in CMYK, and you observe in the ink options that an unintended solid color was used yous can check the "convert all spot colors to procedure" box in the output department to convert all inks to CMYK (watch for color shifting).
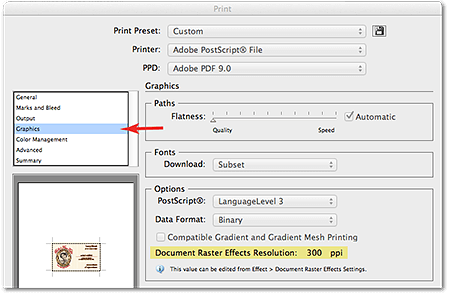
Some programs, such as Adobe Illustrator, may display your "raster effects resolution that control the quality of driblet shadows and other special furnishings that were practical in their software.
Select the Graphics tab
Brand sure a minimum of 300 DPI is specified. Illustrator allows a custom setting, which we normally rez-upwards the to 450 dpi for CMYK documents.
The Problems with Native Art Files
In that location are many different programs that people cull to create their art designs. Some designers use the same professional design software as the press companies use (such as Adobe Illustrator, InDesign or Photoshop). Others may utilize non-professional programs (such as Microsoft Word, Publisher, etc.). When it comes time to sending your finished art files to a commercial printing company, even the professional art programs accept obstacles and sharing problems to overcome.
First, earlier sending the native fine art, all of the images your used in your art must exist or embedded (non linked) in your document, or gathered into a binder and supplied to the printing visitor. Additionally, yous must too gather and supply all of the type fonts that you used in the document, as the receiver may not take them all. Although a knowledgeable graphic designer knows how to overcome both of those issues, these are not the only bug in file sharing.
In that location are also potential compatibility problems unless both you and the receiver have the same version of the blueprint program. Additionally, file sizes of the original native art files can exist very big - too large to email, and will need to transfered by FTP or a file-sharing site, such as DropBox. In that location is a MUCH easier mode - send PDF files!
The PDF file format stands for "Portable Document Format." PDF is digital file format that, when opened on another estimator, volition view exactly the same equally did on the author'southward figurer. Acrobat Reader is the all-time application to use when opening and viewing a PDF file.
It is a free download from Adobe: Download Acrobat Reader
About PDF Compression Settings: one of the nigh amazing features of PDF files is how file sizes are profoundly reduced while maintaining control over image quality. The blazon of PDF you lot make should always depend upon it's intended use. Press-quality PDF files are optimized, but even so retain high-resolution images for commercial quality press. If you are printing to photo paper on your office printer, high-quality print is acceptable. Other setting produce PDF's with a much smaller file size for ease of downloading or emailing - intended to be viewed on a estimator monitor, or when super-high quality is non equally important as small file size.
Note: saving at a PDF resolution higher than what a device is capable of printing unnecessarily creates a bloated file size, and volition non improve the quality of your printing whatsoever. But, a too depression of a setting can compromise an otherwise quality design. The Press Quality PDF setting in Adobe Software volition down-sample images to no less than 300 dpi. (images less than 300 dpi can not, however, be improved) At Peak Printing, some of our presses print at 500 dpi, so we take a Custom PDF Job Option setting that will not downward-sample images lower than 450 dpi. Used in our own pre-press department this Custom PDF Job Option a free download. Once installed, information technology will appear as a "Press-Quality +" in the PDF quality options carte.

How Do I Add Bleed To A Pdf File,
Source: https://www.summitprintingpro.com/resources/making-pdf-files.html
Posted by: palmerrecance.blogspot.com
0 Response to "How Do I Add Bleed To A Pdf File"
Post a Comment